


In this tutorial, Jess Francisco shows you how to create a thank you card full of sparkle and shine using Stickles™ Glitter Gels and Letter It™ Products.
Stickles™ Glitter Gels Thank You Card by Jess Francisco
- Materials
- Instructions
Other
Paper Trimmer
Scissors
Instructions

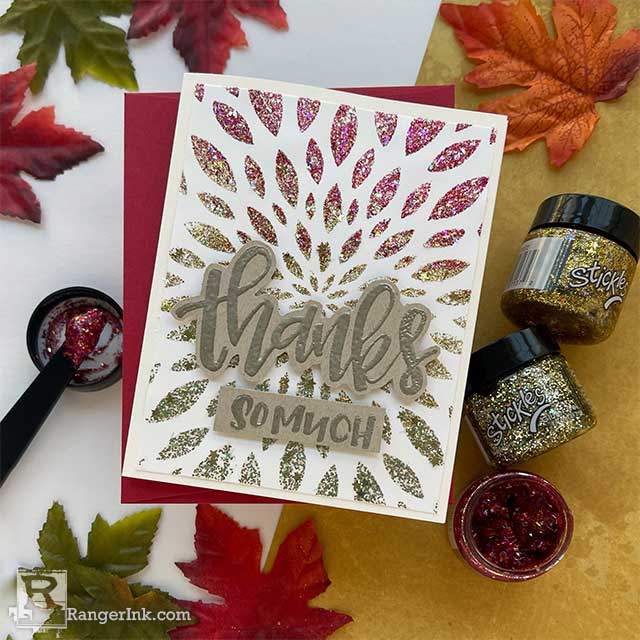
Step 1: Lay the Flower Burst Stencil on top of a white piece of cardstock (cut to 4” x 5.25”) Use the Palette Knife to spread Glitter Gels through the openings of the stencil. Start with Supernova at the bottom, then Solar Flare in the middle section, and Mars at the top. Remove the stencil and set the panel aside to dry. Be sure to clean your stencil right away so the Glitter Gels don't dry on the stencil.

Step 2: Treat a piece of Kraft Cardstock with anti-static pouch. Stamp the 'thanks' and 'so much' sentiments on the Kraft Cardstock with Letter It Embossing Ink. Pour Liquid Platinum Embossing Powder over the wet ink and tap off the excess. Use a Heat Tool to melt the powder.

Step 3: Once the Glitter Gel has dried completely, attach the panel to a white A2 sized card base using Multi Medium Matte.

Step 4: Use a pair of sharp scissors to cut out the 'thanks' sentiment and use your paper trimmer to cut the 'so much' sentiment down to size. Place foam tape on the back of each sentiment and attach them to the card front.

You're done! You've just created a beautiful fall-inspired thank you card.

I’m Jess Francisco from Love, Jess or @lovejessco. I live in Chesapeake with my husband and our sons who are 7 and 4 years old. They keep me busy, so most of my crafting is done while they’re in bed.
I have been creating for as long as I can remember, but I started my card making journey in 2015. I have learned so many techniques and added so many new products to my growing list of favorites. Now that I have a few years under my belt, I’m excited to share what I’ve learned with the crafting community! You can find me on social media as @lovejessco or Love, Jess.
