


by Kassa Hayselden

Spring Chicks by Kassa Hayselden
- Materials
- Instructions
- Dina Wakley Media Brushes
- Tim Holtz Distress® Splatter Brush
- Ranger Multi-Medium: Matte
- Ranger Mini Misters
- Ranger Texture Paste: Opaque Matte
- Ranger Non-Stick Craft Sheet™
- Ranger Watercolor Paper
- Archival Ink™ #0 Pads: Jet Black
- Fude Ball Pen: Black
- Dylusions Stencils: Blocks Large
- Dylusions Cling Mount Stamps: Put A Bird On It, How Does Your Garden Grow, The Write Words
- Dylusions Adhesive Canvas
- Dylusions Journal Insert Sheets: Square
- Dylusions Ink Sprays: Lemon Zest, Bubblegum Pink
- Dylusions 1 oz. Mica Sprays: Vibrant Turquoise, Bubblegum Pink
- Dylusions Paint: After Midnight, Calypso Teal, Cherry Pie, Dirty Martini, Pomegranate Seed, Tangerine Dream, Black Marble, Bubblegum Pink, Crushed Grape, Fresh Lime, Lemon Zest, London Blue, Squeezed Orange, Turquoise, White Linen
- Stabilo All Black Pencil; Colored Pencils: Black. Neon Pink and Yellow; Cotton Thread, Kitchen Roll
Instructions
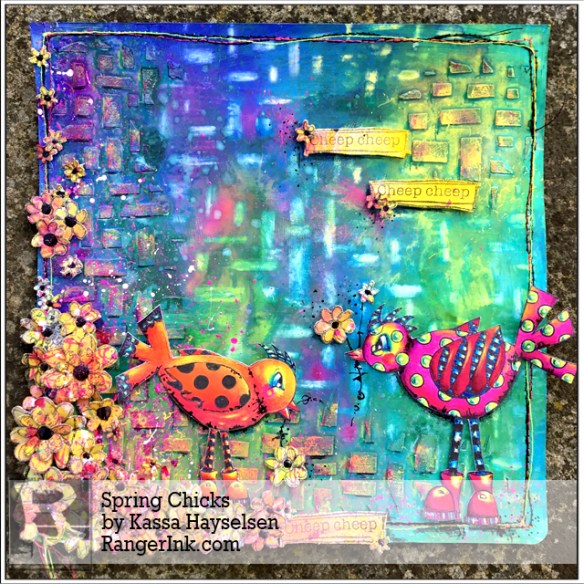
Hi there everyone, Kassa here, so happy to be back again, hope you all had a lovely Easter and the bunnies brought oodles of yummy Easter eggs – Yum! Yum! Yum! (Back on the diet again for me though!)
All this lovely warming sunshine over here in Yorkshire (UK) has totally inspired me to create this happy and colorful ‘Springtime Chicks’ art tutorial. I share how I colorise the fabulous ‘Birdies’ with Dylusions paints, take you through the layers of my background and also a mini tute on how I created the daisies on the new kool ‘Adhesive Canvas!’
 Step 1: Gesso the ‘mixed media’ journal insert – approx 3 generous coats, once dry apply a thin coat of texture paste through the stencil.
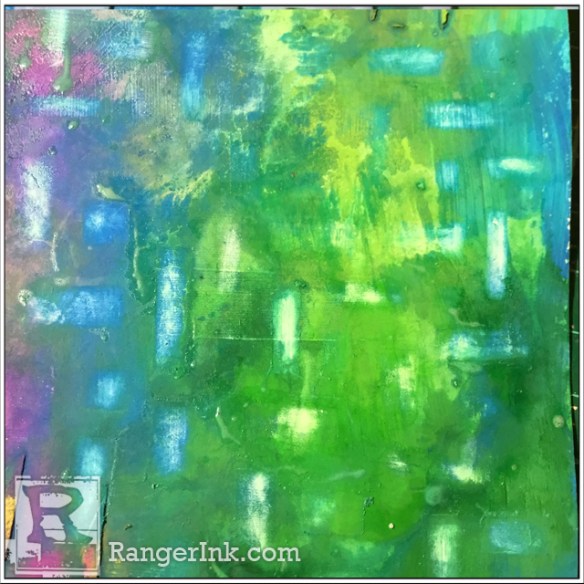
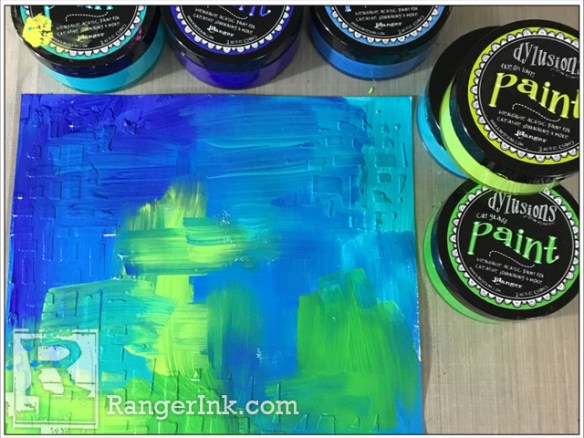 Step 2: Take the ‘blues and greens’ paints and quickly brush on a thick layer of each, greens towards the bottom for the grass and the blues above for sky. Don’t worry about the blend as the next step sorts that out – the key is to be quick though (have all your lids off your paints ready to dip into each, start with the greens!)
 Step 3: Quickly before the paints dry using your Mini Mister, spray all your paint with water and then watch the magic happen. The paints will merge and naturally blend.
 Step 4: Soak up the pools of water carefully with the edges of a kitchen roll, and dab the roll here and there to totally lift the paint, this will leave white ‘cloud like’ patterns. Set aside to dry naturally but keep an eye out for any pooling of the colors that you might want to soak up!
 Step 5: Whilst the background dries naturally, stamp the birdies out on watercolor paper. With a fine brush head paintbrush, paint around the eye with ‘Fresh Lime’ the body with ‘Bubblegum Pink’ but leave some white around the green of the eye. And paint in the boots, remembering to leave ‘white space’ for highlights, I used the new ‘Cherry Pie’ and add a dab of this in for the cheeks too!
 Step 6: The eyes ‘pop’ more with a hint of ‘Calypso Teal’ and a dab of ‘London Blue’ in the corner, fill in the white space with ‘Lemon Zest’.
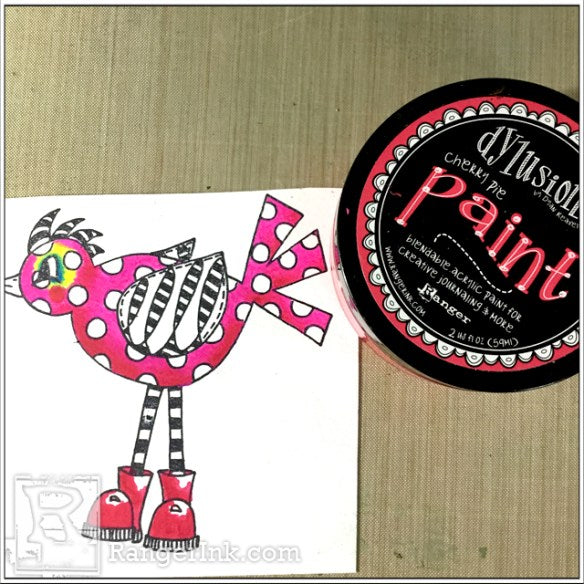 Step 7: Brush a thin coat or 2 of ‘Cherry Pie’ on the underside of the belly, tail feathers, around the neck, under the face and front edge of the face. To help blend, brush out the paint from the edges toward the middle, use very little paint and build your layers. Use a wet wipe for any ‘whoopsie’ moments, and also to help blend, dip your brush in water, wipe nearly dry and blend over the wet paint.
 Step 8: Now apply a thinner band of ‘Crushed Grape’ to all the same areas plus the boots, then an even thinner layer of ‘Pomegranate Seed’ too!
 Step 9: The head feathers, legs and wing patterns are painted with ‘Calypso Teal’, topped with a thin band of ‘London Blue’ then a dab of ‘After midnight’ for shading. Remember to leave a flash of white for hi-lighting. The wings are colorised with ‘Cherry Pie’ and ‘Pomegranate’ is used to paint the lower shade areas. The ‘After Midnight’ adds a ‘spark’ in the corner of the eye too!
 Step 10: Paint the spots with ‘Lemon Zest’, plus the white hi-lights on the boots. The legs, head, feathers and wing patterns have a touch of Lemon added too.
 Step 11: For movement and interest on the yellow spots add a swirl of ‘Fresh Lime’, ‘Calypso Teal’ and a spot of ‘After Midnight’. The first layer of the beak is ‘Cherry Pie’, then add the ‘Pomegranate’ on the underside but leave white space near the top for the ‘Lemon Zest’ which is the final touch.
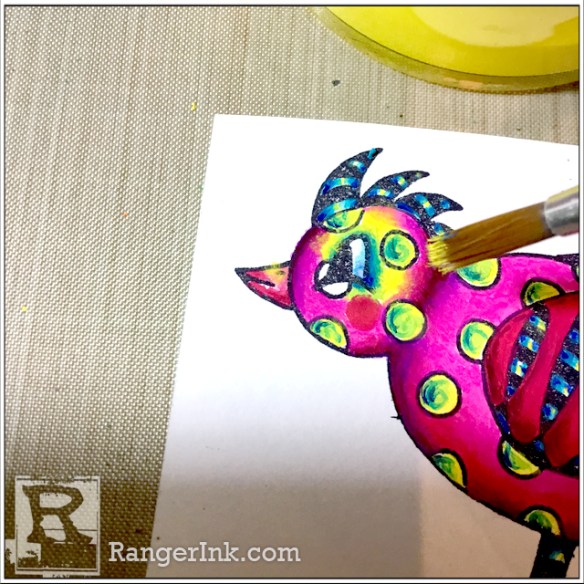 Step 12: With a dry paintbrush pick up a very small amount of ‘Lemon Zest’, wipe the majority of the paint away on kitchen roll or paint off the excess paint on a scrap of paper, then stipple (lightly dab) around the outer edges of the yellow paint around the eyes and boots. This creates a soft fuzzy blend.
 Step 13: Paint a ‘blue hue’ colorwash to the lower inner eye. Following the curve of the wing body, gradually paint in layered lines of ‘Lemon Zest’ to add flashes of light. ‘White Linen’ paint spots are added to all the yellow paint areas and add a tiny touch to the black area of the eye. Colorise the other chicks applying similar techniques and why not try different colors too!
 Step 14: Now back to the fully dry background, take the stencil and whilst holding firm and fast down, take a wet wipe and literally scrub away the paint in the openings.
 Step 15: Keep scrubbing away with the wipe through the stencil as the paint will lift leaving a soft, distressed pattern.
 Step 16: With fingertips and a wet wipe for smudges rub onto the raised texture paste shapes ‘Squeezed Orange’, ‘Fresh Lime’, ‘Lemon Zest’, ‘Bubblegum Pink’, ‘Cherry Pie’ in that order and a spot of ‘After Midnight’ here and there. For the final layer add another swipe of the yellow.
 Step 17: On the left side and under side of the texture paste I scribble various coloring pencils.
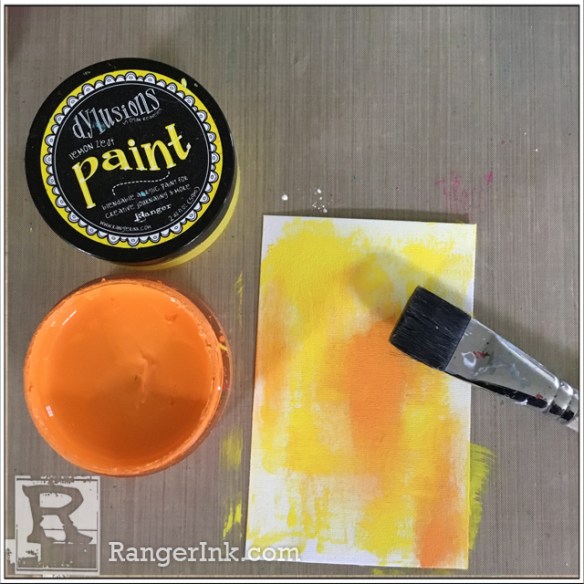 Step 18: Now paint 3 of the Adhesive canvas panels, brush on the ‘Lemon Zest’ first and whilst wet brush over with the ‘Squeezed Orange’.
 Step 19: Add the ‘Bubblegum Pink’ quickly before any paint dries. Only pop a little on your brush because you can always layer up more to get the desired ‘pop’ of pink!
 Step 20: When the pink paint has dried off, to tone down and blend everything add a quick and thin coat of the yellow again.
 Step 21: Take the pink and ‘Calypso Teal’ paint, now paint your craft mat with each color, then take a small stamp from ‘The Write Word’ stamp set, pick up the paints from the mat onto the stamp and in turn to stamp your canvas with color! (mist your stamp with water immediately and clean off the acrylic paint so not to ruin your stamps).
 Step 22: Splats are so much fun and eye-catching. Water down black, white, pink and ‘Calypso Teal’ paint pick up the paints on a small head paintbrush and either wipe the paint across your canvas with a sharp flick of your wrist or gently but firmly tap the end of your brush for more control. (Always try on a scrap first to see if the color is strong enough and how the paint splats.)
 Step 23: An old credit card dipped in the paints and stamped onto the canvas looks so kool too.
 Step 24: Once the canvas is dry peel back the backing and adhere the canvas to black cardstock. Stamp on an array of the small to middle sized daisies and trim out. The ‘Cheep Cheep’ words from the birdies stamps are fab on the canvas, but choose a plain area for the words.
 Step 25: Before adhering the daisies sew the black, neon pink and yellow cotton threads around the edges of the page starting in the bottom left corner so the threads hang loose where the flowers bunch. Adhere the words and flowers with Multi Medium. Spritz the well shaken Mica Spray, pink for the flowers, turquoise in the top left, bottom right corners, the yellow spray is for the top right near the words and I let this drip too. The pink ink I sprayed onto my fingertips and dripped through and around the flowers. Once dry, add the Black Enamel Accents to the flower centres and take the Distress Splatter Brush and dip in the pink paint first, pull back the bristles and splatter from the flowers outwards, repeat with the yellow. (Always practice on a scrap first.)
 Step 26: Finally add a few doodles, splats and shadows! The birdies look kool with a few scribbles here and there (especially on their bottoms teehee!), ground the birdies feet too with a couple of lines and dots. Add the flowers and doodle stems that the birdies are carrying. The words and birds stand off the page more when shaded on the underside with a scribble of the ‘All’ pencil. And the page comes to life miraculously with a few splats of the white paint!


Thanks so much for stopping by today. It would be totally amazing to see any of your ‘Put a Bird On It’ inspired art up over on the Ranger fb page, don’t be shy. After all sharing art with friends is the best- Mwah xoxo Kassa

Related Posts

Dylusions Archival Ink Damned If I Do Journal Page by Jess Peters
Explore the latest Dylusions products in this journal page tutorial with Jess Peters! Crafted in the new Large Ledger...
Read More
Dylusions Layered Stencil Journal Page by Denise Lush
Check out this cool Dylusions journal page tutorial by Denise Lush! Follow along as she demonstrates the art of...
Read More