


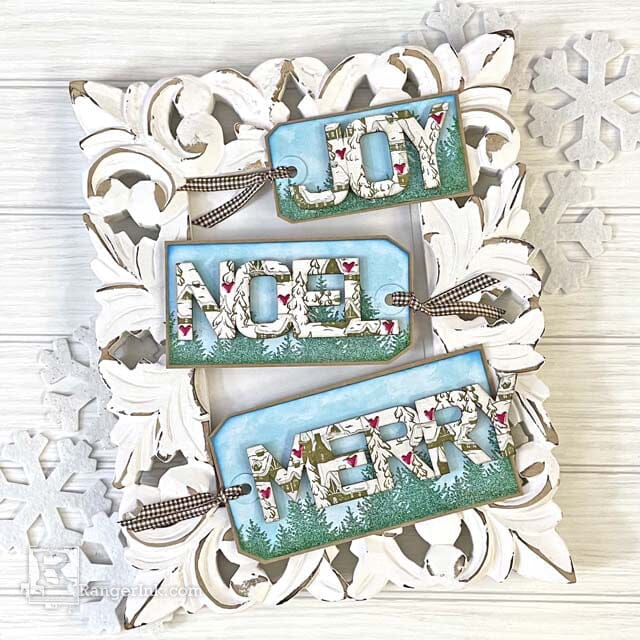
Embrace the enchantment of the season with these Embossed Holiday Treescape Tags by Lauren Bergold! Crafted with magical embossing powder and liquid pearls from the Winter Wonderland Bundle, they're the perfect finishing touch for your Christmas gifts. Your friends and family are sure to adore the festive charm!
Embossed Holiday Treescape Tags by Lauren Bergold
- Materials
- Instructions
Embossing Powder Verdigris
Embossing Powder Green Tinsel
Liquid Pearls™ Bahama Bay
Liquid Pearls™ White Opal
Liquid Pearls™ Raspberry
Emboss It™ Ink Pad Clear
Archival Ink™ Pads Coffee
Archival Ink™ Pads Manganese Blue
Archival Ink™ Pads Library Green
Wendy Vecchi MAKE ART Chippies Statements
Simon Hurley create. Background Stamp Treescapes
Simon Hurley create. Photopolymer Stamp Winter Wonderland
Dina Wakley Media White Tag Assortment #3 & #5
Dina Wakley Media White Tags #8
Ranger Craft Tags #8 Kraft
Ranger Heat It™ Craft Tool
Wendy Vecchi MAKE ART Stay-tion
Ranger Artist Brushes
Wendy Vecchi MAKE ART Perfect Card Adhesive
Letter It™ White Foam Roll Tape
Instructions
The holiday season is here and there's no such thing as too much sparkle and shine! For this project I've made my own custom blend of Ranger Embossing Powders to make these tags extra special.

Step 1: Gather materials: Ranger Embossing Powder in Verdigris and Green Tinsel; Ranger Liquid Pearls in Bahama Bay and White Opal; Wendy Vecchi Statements Chippies; Simon Hurley create. Treescapes and Winter Wonderland stamp sets; Dina Wakley white tags in sizes #3, #5 and #8; as well as Ranger Kraft Tags in size #8.

Step 2: In a small clean container, mix together Ranger's Verdigris and Green Tinsel Embossing Powders in approximately equal parts; stir and/or shake until they are well-combined.

Step 3: Stamp the row of pines from Simon Hurley's create. Treescapes Background Stamp along the bottom edge of a white #3 Dina Wakley tag, using Ranger's Emboss It Ink in Clear.

Step 4: Sprinkle the stamped image with your custom Verdigris/Green Tinsel embossing powder; tap off the excess and use a small brush to remove any stray powder. Emboss using Ranger's Heat It Craft Tool. Repeat steps three and four on a white #5 tag and on a white #8 tag that's been trimmed down to the size of a #7 tag (5.75 x 2.75"). Allow the tags to cool completely.

Step 5: Dispense a small amount of Bahama Bay Liquid Pearls onto a palette and dilute with water, using approximately three parts water to one part Liquid Pearls. Use an older brush and messy strokes to add blue sky all around the trees on your embossed tags. With a crumpled tissue or small rag, gently blot off some of the color, so that your sky will have lighter and darker patches of blue. Set aside an allow to dry completely. (Note: if you save plastic lids you'll have a fresh palette each time and NEVER have to clean them!)

Step 6: Stamp the cluster of small cottages from the Winter Wonderland clear stamp set in Coffee Archival Ink on the "Joy" Chippie from Wendy Vecchi's Statements Chippies set. Note that when repeating this step on the "Noel" and "Merry" Chippies, you'll need to re-position and re-stamp several times in order to cover the entire Chippie word with cottages and trees.

Step 7: Carefully apply a small amount of White Opal Liquid Pearls to all of the eaves and chimneys on the stamped cottages. Set the completed Chippies aside and allow to dry completely.

Step 8: (Optional!) Using the template from Ranger's Stickles Confetti Tutorial (https://rangerink.com/blogs/projects/stickles-confetti) as a guide, make small hearts by applying Raspberry Liquid Pearls in a V-shape inside each circle. Set the template aside on a flat surface and allow to dry completely, preferably overnight. (Note: If you're very brave you can apply the hearts directly onto the chippies; if hearts are not your aesthetic, you can skip this step completely!)

Step 9: Assembly: Ink the edges of the tags with Manganese Blue Archival Ink at the top and Library Green at the bottom. Adhere the completed white tags to some larger #8 Kraft Tags using Wendy Vecchi Perfect Card Adhesive, trimming the Kraft tags down so that there’s just a very thin border of Kraft around your designer tags. Add the adorned Statements Chippies to the tags with small pieces of Letter It White Foam Roll Tape. Use small dots of Perfect Card Adhesive to affix each tiny heart to the Chippie words. Thread a small piece of ribbon through the top of each tag, if desired.

Step 10: Realize that ALL of your friends and family are going to want a tag of their own... Repeat steps one through nine until you have enough!
 My name is Lauren Bergold, and I live in central New Jersey with my husband of 30+ years and A LOT of art supplies! My favorite medium is paper, and I especially love making cards. I teach papercrafting classes, as well as collecting and compiling vintage and found papers. You can find me on my blog, All the Good Blog Names Were Taken, and on Instagram as @llaurenb where I love to connect with other artists and makers!
 Related Posts

Make your Santas Sparkle with Stickles Glitter Gels by Kimberly Boliver
Upgrade your holiday cards with Stickles Glitter Gels! In this festive tutorial, Kimberly Boliver makes Santa sparkle with vibrant...
Read More
Simon Hurley create. Woodsy Christmas Card by Lieschen Harshbarger
Still immersed in the holiday card-making spirit? Get inspired with this idea! Lieschen Harshbarger works her magic...
Read More