Instructions
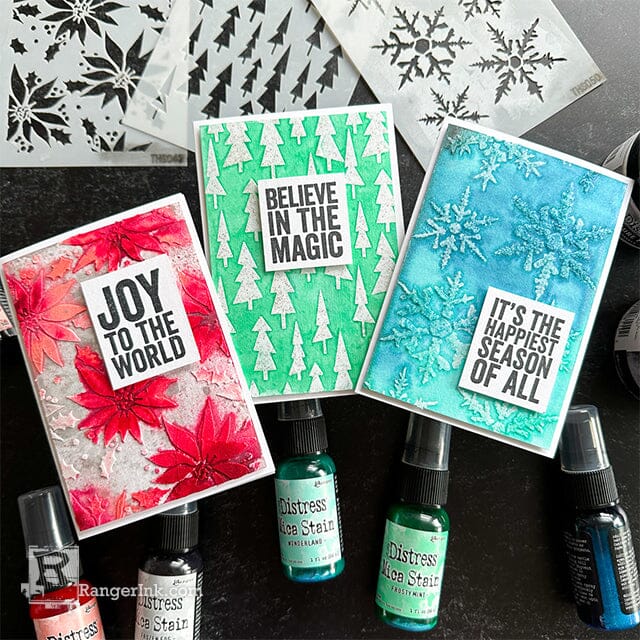
Hi there crafty friends! It’s Cheiron Brandon here and I am back with a new project to share with you using some of the brand new Distress Christmas Mica Stains. There are two new sets of Distress Mica stains that were just released. For these cards, I am going to show you how all these new colors work together using some of my favorite techniques to make a set of mini notecards that combine pastes and simple sentiments.
Remember to shake your stains to mix the mica, I find it best to move them side to side like ringing a bell. I store them on their sides while working with them.

Step 1: Gather your supplies, you will need Distress Watercolor Cardstock, Distress Mica Stains (Juniper Berry, Yuletide, Frozen Fog, Sugary Gumdrop, Wonderland, Frosty Mint), Distress Texture Paste in Opaque and Sparkle, Grit Paste in Snowfall and a Distress Sprayer.
We are going to make 3 different panels today, each one with a different texture paste and technique. Whenever I take on a project using pastes, I normally create a bunch of panels at once and let the paste dry thoroughly.

Step 2: For our first panel, spray the Distress Watercolor Cardstock with a mist of water using a Distress Sprayer and then the Frozen Fog Distress Mica stain. Let dry or dry with a heat tool.

Step 3: Take the Frozen Fog panel and use a palette knife to apply Distress Opaque Texture Paste through the Poinsettia stencil. Wash your stencil, set the panel aside to dry.

Step 4: For our second panel, use a palette knife to add some Snowfall Grit Paste through the Snowflakes stencil. Wash your stencil, set the panel aside to dry.
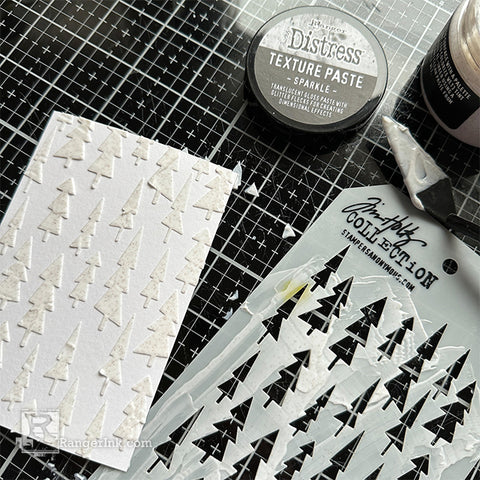
Step 5: For our third panel, use a palette knife to add some Sparkle Distress Texture Paste through the Tree Lot stencil. Wash your stencil, set the panel aside to dry.

Step 6: Take your dry Frozen Fog panel, lay the cleaned Poinsettia stencil back over it and spray the Yuletide Distress Mica Stain, trying to keep it toward the center part of each flower.

Step 7: Keeping the Poinsettia stencil in place, now spray the Sugary Gumdrop spray over the rest of the flowers. Let dry completely.

Step 8: Take your dry Snowflake panel, mist it with a bit of water then spray on the Juniper Berry and Wonderland sprays. Let dry completely.

Step 9: For the last Tree Lot panel, mist it with a bit of water, then spray on the Distress Mica Stains in Frosty Mint and Wonderland sprays. Let dry completely.

Step 10: Once the Tree Lot panel is dry, wipe any stain that has beaded up over the paste with a dry paper towel or cloth.

Step 11: Add panels to card bases with foam tape.


Step 12: Stamp sentiments from the Mini Bold Tidings stamps using Black Soot Distress Archival Ink. Add sentiments to card bases with foam tape.